Using Geospatial Data with Microsoft ASP.NET MVC Web Applications and Entity Framework ORM

In a previous blog post, HERE, I detailed how to use Geospatial data like Latitude and Longitude coordinates to find distances between locations in the Cocoa Beach, Florida area and the Central Florida area, in a Microsoft SQL Server Database with TSQL Scripting. This is actually one of two different methods to use Geospatial data in the Microsoft Stack. To use Geospatial data with an ASP.NET MVC Web Application with Entity Framework ORM and using the Microsoft C# .NET Programming Language, it is an entirely different creature. In this blog post, I will show how to use Geospatial data in such a web application.
For the complete GeoSpatial application in my Azure DevOps source repo, go to the following link:
In this blog post I will go step by step showing how to build this web application.
Since we are doing our web application as database first Entity Framework, please be sure to run this copy and pastable TSQL script from my previous blog post in the database you are using.
To help those new to ASP.NET MVC Web Applications using Entity Framework, I am also including basic directions on creating the web application which experienced developers can disregard. Also, new developers may want to consider the microsoft page detailing how to make the Contoso University ASP.NET MVC Web Application with Entity Framework, HERE. It is a good example showing how to work with Entity Framework ORM.
In this example we will be using the Microsoft Visual Studio IDE, the community edition is available for free for individual developers and students, and for developers working for a company in teams, there are professional and enterprise versions available for a monthly subscription fee, or for a one time fee for purchase outright.
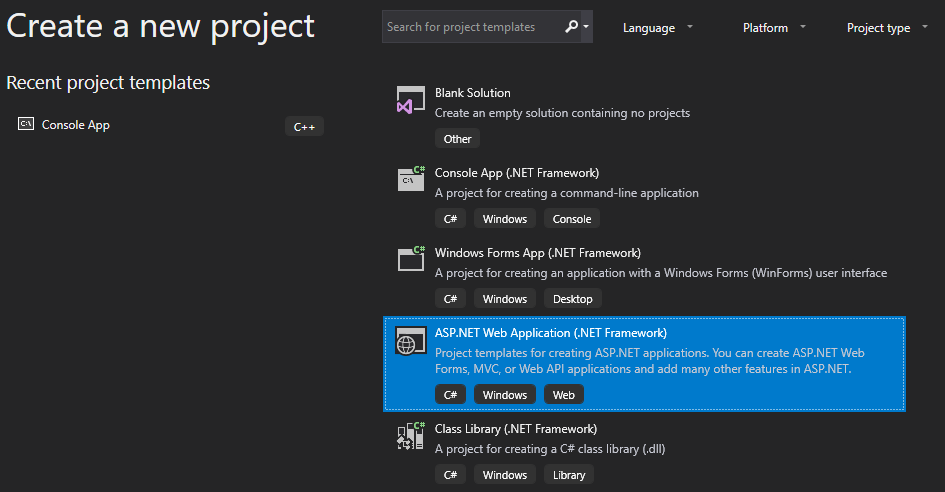
To first create the new project in Microsoft Visual Studio, we choose the File->New->Project option, and then we select ASP.NET Web Application from the list of options, which should look like the following:
In the next screen we will enter the name of our web application project, like the following:

Then we move to the next screen where we choose to use the MVC option, note that we are not using the EMPTY option, but the regular MVC option that will include default views and is ready to run right out of the box. Leave the Authentication option as-is since we are not password protecting this web application, and also leave the Web Forms and Web API boxes unchecked.

Next we will install Entity Framework into our project, we can do this from the command line by choosing the menu option TOOLS->NUGET PACKAGE MANAGER->PACKAGE MANAGER CONSOLE, like in the following:

Next we will enter the following command at the bottom of the screen in the Package Manager Console which will let us install Entity Framework (EF):

After the package for Entity Framework (EF) is installed, you should receive a confirmation message like the following in the Package Manager Console at the bottom of the screen:

In our next step, we need to add a reference to our project for the Library that lets us use Geospatial type data in our project, like in the images, Right Click on the word REFERENCES in our project in the solution explorer pane, and choose the option ADD REFERENCE, then scroll down and check the checkbox for library SYSTEM.DATA.ENTITY, we can now include this library in our project files using the USING Statement.


In our next step, we will create our EF model class to be used in our project, with a DBGeography property for processing Geospatial data, right click on the MODELS folder and choose the ADD option, then choose the CLASS option, then call the class GeoTest.cs, and choose the Add option, like in the following:


Since this is only an example application, we will name our new class GEOTEST, the same name as the table we created previously with SQL Server. In this case our class will look like the following:
using System;
using System.Data.Entity.Spatial;
using System.ComponentModel.DataAnnotations;
using System.ComponentModel.DataAnnotations.Schema;

namespace GeoSpatial.Models
{
    [Table("GeoTest", Schema = "dbo")]
    public class GeoTest
    {
        [Key]
        [Required]
        [DatabaseGenerated(DatabaseGeneratedOption.Identity)]
        public Guid ID { get; set; }

        [Required(AllowEmptyStrings = false), MaxLength(100)]
        [Display(Name = "Location")]
        public string Location { get; set; }

        [MaxLength(50)]
        [Display(Name = "Latitude")]
        public string Latitude { get; set; }

        [MaxLength(50)]
        [Display(Name = "Longitude")]
        public string Longitude { get; set; }

        [Display(Name = "GeoPoint")]
        public DbGeography GeoPoint { get; set; }
    }
}
Note we are using data annotations in this EF model class, and also a TABLE annotation that lets us designate the table name and schema for the database table we connect to with EF. Normally in EF the model class maps to the database table with the same name by default, but using the TABLE tag we can map the model class to any table we want, however, it is considered good form to use the default method.
Note that the properties in our EF model class match exactly to our database table GEOTEST, Latitude and Longitude columns are NVARCHAR(50) in the database, these will match to a string type in the C# code, for our GeoPoint column which is type GEOGRAPHY in the database, these will match to a property in our C# code of type DbGeography.
Make sure to include all the libraries in the USING statements at the top of our GeoTest class, without them the software will not work correctly.
Next, we will make our context class, the context class is very important in Entity Framework (EF), it allows the data in the EF classes to be inserted, updated, and read in the database connected to the EF class model. Context classes derive from the DbContext base class. To start with our context class, create a new folder in the project called DAL, for Data Access Layer, and then right click on the folder, and choose the options ADD->Class->C# Class. The standard to naming the context class is to name it the same name as the project, in our case we will name the context class GeoSpatialContext. We want our finished context class to be the following code:
using System;
using System.Collections.Generic;
using GeoSpatial.Models;
using System.Data.Entity;
using System.Data.Entity.ModelConfiguration.Conventions;

namespace GeoSpatial.DAL
{
    public class GeoSpatialContext : DbContext
    {

        public GeoSpatialContext() : base("GeoSpatialContext")
        {
        }

        public DbSet GeoTests { get; set; }

        protected override void OnModelCreating(DbModelBuilder modelBuilder)
        {
            modelBuilder.Conventions.Remove();
        }
    }
}
After creating the context class, next you have to create a matching entry in the Web.Config file for the context which includes the database connection string. If you are using Azure SQL Server database, Azure Portal will auto create a connection string you can copy and paste into your Web.Config file, simple to do. If you are using LocalDB like in the Contoso University Example MVC Application, follow the instructions there for configuring your application context in Web.Config file.
The full content of the Web.Config file in copy-and-pastable text is listed on my Azure DevOps version control at the following link:
Here is an example of the context for our GeoSpatial MVC web application in Web.Config file, including the connection string for the Azure SQL Server database I am using in the application, with the database password redacted, of course.
<connectionStrings>
          <add name="GeoSpatialContext"
	connectionString="Server=tcp:abiondb.database.windows.net,1433;"
	Initial Catalog=FoodPantryDB;
	Persist Security Info=False;
	UserID=abionadmin;
	Password=REDACTED;
	MultipleActiveResultSets=False;
	Encrypt=True;
	TrustServerCertificate=False;
	Connection Timeout=300;"
	providerName="System.Data.SqlClient" />
</connectionStrings>
For a complete listing of the Web.config file in copy and pastable text, go to the following link for my Azure DevOps repo for the GeoSpatial application: Web.config
Once you have created the Context class and also added the corresponding entry to Web.Config file with connection string, your application is now ready to access database data using Entity Framework (EF), but there is still more work to do to complete our GeoSpatial ASP.NET MVC Web Application.
Now for our next step, we want to create a new class that will not update the database when changes are made to the data in the class, these types of classes are called View Models, and in EF they are frequently used to store data results from a LINQ query in the C# code, for use in Razor views of the web application. Create a new folder in the project called ViewModels, like in the following:


and then add the following C# class to the folder, note that it is good form to use the suffix VM in the name of the ViewModel class, like in this class the name is LocationsVM.cs, to easily identify it as a View Model class:


Here is a copy-and-pastable listing of our Locations View Model LocationsVM.cs
using System;
using System.ComponentModel.DataAnnotations;

namespace GeoSpatial.ViewModels
{
    public class LocationsVM
    {
        [MaxLength(100)]
        [Display(Name = "Location")]
        public string Location { get; set; }

        [MaxLength(50)]
        [Display(Name = "Latitude")]
        public string Latitude { get; set; }

        [MaxLength(50)]
        [Display(Name = "Longitude")]
        public string Longitude { get; set; }

        [Display(Name = "Distance To Source (Miles)")]
        public Nullable DistanceToSourceMiles { get; set; }

        [Display(Name = "Distance To Source (Kilometers)")]
        public Nullable DistanceToSourceKilometers { get; set; }
    }
}
Note that properties in a ViewModel class can be whatever we want them to be, since they do not map to table columns in a database. In this ViewModel we are creating here, we are designing it to display data we want to display on a Razor view of the web application.
Also, Note that creating the MVC project included several views by default for About, Contact, Home, and we will add new views called License and Locations and LocationDistances, however the LocationDistances view will not have a link in the layout file, because it will display the results of a form submit in the Locations view, we do not want to link directly to the LocationDistances view, only to access it through a form submit, which we will look at later in the post. The license view will contain info about the MIT open source license used with this example project. The Locations view is where we will start making distance calculations with GeoSpatial data like Latitude and Longitude.
The License view is optional and not required for the application we are working with for Geospatial data. I just added it here so that people would know that this is a freely distributable open source MVC web application under the MIT Open Source License.
To add the links to these new views in the layout of the application, open the file VIEWS->SHARED->_Layout.cshtml, and add the links to the new license and locations views like in the following:
    <div class="navbar navbar-inverse navbar-fixed-top">
        <div class="container">
            <div class="navbar-header">
                <button type="button" class="navbar-toggle" data-toggle="collapse" data-target=".navbar-collapse">
                    <span class="icon-bar"></span>
                    <span class="icon-bar"></span>
                    <span class="icon-bar"></span>
                </button>
                @Html.ActionLink("GeoSpatial", "Index", "Home", new { area = "" }, new { @class = "navbar-brand" })
            </div>
            <div class="navbar-collapse collapse">
                <ul class="nav navbar-nav">
                    <li>@Html.ActionLink("Home", "Index", "Home")</li>
                    <li>@Html.ActionLink("About", "About", "Home")</li>
                    <li>@Html.ActionLink("Contact", "Contact", "Home")</li>
                    <li>@Html.ActionLink("License", "License", "Home")</li>
                    <li>@Html.ActionLink("Locations", "Locations", "Home")</li>
                </ul>
            </div>
        </div>
    </div>
For a complete listing in copy and pastable text for the _Layout View, go to the following link for my Azure DevOps repo for the GeoSpatial application:
These are the names we are using for these app views in the GeoSpatial example application we are building, of course, you can name these views to whatever you wish them to be, dependent on the particular web application you are working on. GeoSpatial functionality has no dependency on the names of the Razor views being used in the MVC web application.
Highlight the folder VIEWS->HOME then right click the mouse and choose the ADD option, choose the VIEW option since we are adding a new view to the project, in this GeoSpatial example project we are calling our view LOCATIONS, Choose Models.GeoTest as the model to be used by this view, and also make sure the shared view _Layout is included in this view also, like the following:


After creating our new view, we are going to add an HTML form to the view that will collect the Latitude and Longitude and the name of our Source location for our geospatial calculations. This is what the form looks like in our GeoSpatial example application, be sure to include the AntiForgeryToken tag in the HTML markup, which helps protect the web application from security compromises.
    <h4>Source Location</h4>

    <form method="post" id="FindDistancesForm" action="/Home/Locations">
        <hr />
        @Html.AntiForgeryToken()

        @* Location *@
        <div class="form-group">
            @Html.LabelFor(model => model.Location, htmlAttributes: new { @class = "control-label col-md-2" })
            <div class="col-md-3">
                @Html.EditorFor(model => model.Location, new { htmlAttributes = new { @id = "Location", @maxlength = "100", @class = "form-control" } })
            </div>
        </div>

        @* Latitude *@
        <div class="form-group">
            @Html.LabelFor(model => model.Latitude, htmlAttributes: new { @class = "control-label col-md-2" })
            <div class="col-md-3">
                @Html.EditorFor(model => model.Latitude, new { htmlAttributes = new { @id = "Latitude", @maxlength = "50", @class = "form-control" } })
            </div>
        </div>

        @* Longitude *@
        <div class="form-group">
            @Html.LabelFor(model => model.Longitude, htmlAttributes: new { @class = "control-label col-md-2" })
            <div class="col-md-3">
                @Html.EditorFor(model => model.Longitude, new { htmlAttributes = new { @id = "Longitude", @maxlength = "50", @class = "form-control" } })
            </div>
        </div>

        @* Form Submit Button *@
        <div class="form-group">
            <div class="col-md-offset-2 col-md-10">
                <button id="FindBTN" type="button" value="Find" class="btn btn-primary">Find Distances</button>
            </div>
        </div>
For a complete listing of the View in copy-and-pastable text, go to the View in my Azure DevOps repo for the GeoSpatial application at the following link:
Next, we will work on the code in our controller file to process the Geospatial coordinates. Open the file CONTROLLERS->HomeController.cs like in the following:

Next we need to be sure to include all the correct USING statements for our controller to work correctly, be sure to include using statements for the Models folder where our EF class models are located, for ViewModels folder where our ViewModel class is located, and also our DAL folder where our context class is located.
Also, be sure to include the using statement for the Spatial library which will enable distance calculations to be made with our Latitude and Longitude coordinates.
Also, in the controller class itself, we will create a private variable called DB for access to our database data, the DB var will be a new GeoSpatialContext object we will be using in this particular controller.
When you are finished the code at the top of your controller should look like the following.
using System.Data;
using System.Linq;
using System.Web.Mvc;
using GeoSpatial.Models;
using GeoSpatial.ViewModels;
using GeoSpatial.DAL;
using System.Data.Entity.Spatial;

namespace GeoSpatial.Controllers
{
    public class HomeController : Controller
    {

        // db context
        private GeoSpatialContext db = new GeoSpatialContext();
In the next and final step, we will configure our action methods in our home controller to process the Locations view Latitude and Longitude coordinates, and create a list of locations with the distance to each location from our source location in miles and kilometers. At the bottom of the HomeController.cs file, add the following code:
        public ActionResult Locations()
        {
            ViewBag.Message = "Your locations page.";

            return View();
        }

        // POST: Home/Locations
        // To protect from overposting attacks, please enable the specific properties you want to bind to, for
        // more details see http://go.microsoft.com/fwlink/?LinkId=317598.
        [HttpPost]
        [ValidateAntiForgeryToken]
        public ActionResult Locations([Bind(Include = "ID, Location, Latitude, Longitude, GeoPoint")] GeoTest geotest)
        {
            // build the location point string from latitude and longitude for the source location
            var sourceLocation = DbGeography.FromText("POINT(" + geotest.Longitude + " " + geotest.Latitude + ")");

            // linq query to get distances to source location and add to ViewModel
            var locationDistances = (from u in db.GeoTests
                    orderby u.GeoPoint.Distance(sourceLocation)
                    select new LocationsVM {
                    Location = u.Location,
                    Latitude = u.Latitude,
                    Longitude = u.Longitude,
                    DistanceToSourceMiles = (u.GeoPoint.Distance(sourceLocation) / (1609.344)),
                    DistanceToSourceKilometers = (u.GeoPoint.Distance(sourceLocation) / (1000))
                    });

           // ViewBag variable to pass data to view
           ViewBag.LocationDistances = locationDistances.ToArray();

            return View("LocationDistances",geotest);
For a complete listing of this controller in copy-and-pastable text, go to the following link in my Azure DevOps source repo for the GeoSpatial application:
Ok we will next explain what this code does, the first ActionResult method is for when the user first visits the Locations page (view) of the GeoSpatial web application, no calculations are made in this view action, it only displays the form we previously created, LOCATIONS, which gathers the Latitude and Longitude and name of our Source Location, and then the user can do a form submit with that form which will be processed in the next ActionResult method in our code section.
This ActionResult method has data annotations designating that it is processing an HTML form submit as an HTTP POST, and also another data annotation for processing an AntiForgerytToken in the html form itself.
The ActionResult line of the method includes a BIND parameter to map all the properties of the GEOTEST object that is being submitted with the form, this prevents overposting attacks on the web application.
In the first line of code, we will create a location point, using the DbGeography type, for the source location using the Latitude and Longitude passed in to the controller action method in a GeoTest object, then in the next line of code we will create a list of locationDistances using a LINQ Query which will also populate LocationsVM ViewModel objects.
In the LINQ Query, note how we use the Distance() method to get the distance between two points, the distance method returns that data in meters, which we then convert to miles and also kilometers. The distance method returns the meters as Nullable DOUBLE types, so the corresponding properties in our LocationsVM ViewModel are also Nullable DOUBLE types.
To get the distance in miles, we divide the meters number by 1609.344, which is the number of meters in a mile. To get the kilometers, we divide by 1000 since there are 1000 meters in 1 kilometer, simple to do overall.
Using Nullable DOUBLE Types for the distances in the ViewModel also makes rounding the numbers in the Razor view simple to do, since the precision of the distances is to a single meter, large decimal precisions for the distances in miles and kilometers require the numbers to be rounded to a smaller precision for readability.
Next, we create a ViewBag variable to pass the location distances to the view as an array of LocationsVM objects.
And finally, we go back to our LocationDistances view and pass into it the GeoTest object that contains the source location coordinates and source location name. Also, we have the ViewBag variable for the distances available in the View by default as well.
Normally, to use a ViewBag variable in a Razor View, you have to cast it to whatever type var that was originally added to the ViewBag variable in the controller, in our LocationDistances view we do this at the top of our View file using the following code to cast the ViewBag variable to an array of LocationsVM ViewModel objects. Also be sure to add the using statement to include the project's ViewModels in the View.
@model GeoSpatial.Models.GeoTest
@using GeoSpatial.ViewModels

@{

    ViewBag.Title = "Location Distances";
    Layout = "~/Views/Shared/_Layout.cshtml";

    // cast the locations distances results
    IEnumerable locationDistances = (IEnumerable)ViewBag.LocationDistances;

    // index for row shading
    bool evenRow = true;
}
We also have a bool variable declared to keep track of even and odd rows of data to make it simple to add row shading for readability.
Next, in our LocationDistances view we will declare a section of HTML to display the source location info, this info will be obtained from the GeoTest object passed into the view by the controller. This is what our HTML markup will look like:
<h2>Location Distances</h2>

@* Display the Source Location Info *@
<div>
    <h4>Source Location</h4>
    <hr />
    <dl class="dl-horizontal">
        <dt>
            Location
        </dt>
        <dd>
            @Html.DisplayFor(model => model.Location)
        </dd>
        <dt>
            Latitude
        </dt>
        <dd>
            @Html.DisplayFor(model => model.Latitude)
        </dd>
        <dt>
            Longitude
        </dt>
        <dd>
            @Html.DisplayFor(model => model.Longitude)
        </dd>
    </dl>
</div>
Next, we will have a section of HTML to display the location distances in our array of LocationsVM ViewModel objects, first we will check to make sure the array is not null and is not empty like in the following code.
@* Display The Location Distances To Source Location *@
<h4>Location Distances To Source Location</h4>

@if ((locationDistances != null) && (locationDistances.Count() > 0))
{
    <div class="row">
        <div class="col-sm-3">
            <b>Location</b>
        </div>
        <div class="col-sm-3">
            <b>Latitude</b>
        </div>
        <div class="col-sm-3">
            <b>Longitude</b>
        </div>
        <div class="col-sm-1">
            <b>Distance to Source (Miles)</b>
        </div>
        <div class="col-sm-1">
            <b>Distance to Source (Kilometers)</b>
        </div>
    </div>
Now that we have a header for our data rows, we will then loop through the array of LocationsVM objects displaying the distance of each location from the source location, like in the following code:
    @foreach (var location in locationDistances)
    {
            <div class="row" style="background-color:@(evenRow ? "lightgrey" : "white")">
                    <div class="col-sm-3">
                        @location.Location
                    </div>
                    <div class="col-sm-3">
                        @location.Latitude
                    </div>
                    <div class="col-sm-3">
                        @location.Longitude
                    </div>
                    <div class="col-sm-1">
                        @location.DistanceToSourceMiles.Value.ToString("0.0")
                    </div>
                    <div class="col-sm-1">
                        @location.DistanceToSourceKilometers.Value.ToString("0.0")
                    </div>
                </div>

        evenRow = !evenRow;
    }
For a complete listing of our LocationDistances View in copy-and-pastable text, go to this link for my Azure DevOps source repo for the GeoSpatial application:
Note the trick we are using with the bool variable evenRow to shade the alternate rows a light grey with some simple CSS, and also note how we are rounding the decimal precision of the distances in miles and kilometers using the ToString() method for a more readable single decimal place with the distance numbers.
@location.DistanceToSourceMiles.Value.ToString("0.0")
@location.DistanceToSourceKilometers.Value.ToString("0.0")
That is all there is too it!! Microsoft made working with Geospatial coordinates like Latitude and Longitude exceedingly simple. You can view copy and pastable source code for this project on my Azure DevOps source code repository at the following link:
To see my Curriculum Vitae, go to Michael G Workman CV
To see my projects on Azure DevOps, go to https://dev.azure.com/AbionTechnology/
To see my Posts and Answers on Stack Overflow, go to Michael G. Workman on Stack Overflow
If you have any questions about C, C++, Microsoft C# .NET, Microsoft Azure Cloud, Unix, Linux, and/or Mobile Apps, please feel free to contact me by email at:
michael.g.workman@outlook.com

